A “Fresh Install with Data Export” is a native method used to migrate UC application clusters to a new version while preserving the existing configuration data.
I personally prefer using Cisco’s PCD for migrations. However, since PCD is in survival mode, Cisco recommends using the native option, which is the “Fresh Install with Data Export.”
Cisco is in the process of bringing all the capabilities of PCD natively to CUCM.
In this blog, I explain how to export data from an old cluster to an SFTP server for use in a Fresh Install. You can also perform the fresh install using a touchless installation with an AFG file. To learn more about Touchless VM installation, please refer to my previous blog.Touchless VM installation .
This process involves exporting data from the current UC cluster and importing it into a newly installed cluster. Let’s split this into the following 3 tasks:
Task 1: Identify the Versions
You need to determine if the version you are moving to supports a fresh install with data export. If the utils system upgrade dataexport initiate command is not available on the source cluster, you need to install the COP files mentioned below.
Supported Versions for Fresh Install with Data Export:
- CUCM & IMP: Supported on versions 12.5SU5/14+ and source releases 10.5, 11.5, 12.5, 14.
- CUC: Supported on version 14SU1 and above and source releases 11.5.x, 12.0.x.
COP Files for Versions Without utils system upgrade dataexport initiate:
- CUCM/IMP:
ciscocm.DataExport_v4.0.cop.sha512(applicable on 10.5, 11.x, 12.x up to 12.5 SU4). - CUC:
ciscocm.cuc_DataExport_v1.1.k4.cop.sha512(applicable on 11.5.x, 12.0.x to pre-12.5SU5, and 14FCS). From 12.5SU5, the command is natively available on CUC.
Note: Make sure to read the release notes of the data export COP before installing it.
Since this is a release key signed COP, the installation of ciscocm.enable-sha512sum-v1.0.cop.sgn is required before installing the data export COP file ciscocm.cuc_DataExport_v1.1.k4.cop.sha512 on the following Cisco Unity Connection versions:
- 11.0.x to pre-11.5SU10
- 12.0.x to pre-12.5SU4
I have not included the details on how to install the COP file on UC applications here. However, I will create a separate blog on installing the COP file and mention the link here later.
Task 2: Export Data from the Source Cluster
You need an SFTP server to transfer the exported data. Before exporting the data, ensure you have an accessible SFTP server that the UC application can reach. For this blog, I have used SolarWinds SFTP applications.
First, you need to export the data from the Publisher node, followed by the Subscriber nodes, including IMP in the cluster.
- Publisher:
- Log in to the CUCM Publisher’s command line interface.
- Run the command
utils system upgrade dataexport initiate.

- Provide the SFTP server details and monitor the export progress using
utils system upgrade dataexport status.


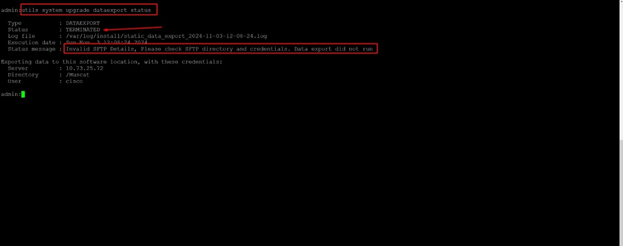
The status will show “completed” with a message “migration export completed successfully.”
If the migration fails for any reason, you will see a “terminated” message along with the reason for the termination as mentioned in the images below.
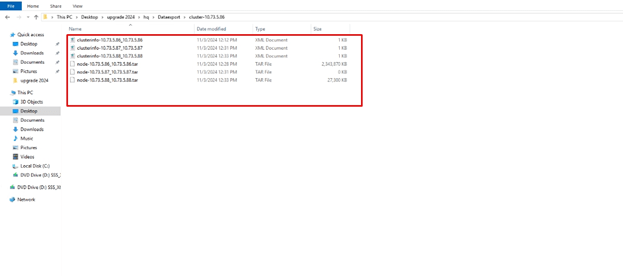
- The data export command will create a folder inside the SFTP directory you provided, named
cluster-<IP ADDRESS OF PUBLISHER>. Inside this folder, you will find aClusterinfo.xmlfile and tar files for each node in the cluster, as shown in the images below.


- Subscriber:
- Repeat the same steps for the Subscriber node.
Task 3: Fresh install the Cluster with importing the data.
- Shutdown the Source Cluster
This step is required when migrating to the same IP. If you are migrating to a different IP, this shutdown is not necessary. However, when migrating to a different IP, make sure to perform the Bulk Certificate Exchange. If you skip this process, the phones will not trust the new cluster, and you will need to remove the CTL from the phones to make them register with the new cluster.
- Execute utils system shutdown on both the Publisher and Subscriber to safely power down the source cluster.
- Install the New Publisher
- Set up a virtual machine for the new Publisher using the appropriate OVA template.
- Mount the CUCM bootable image and start the installation.

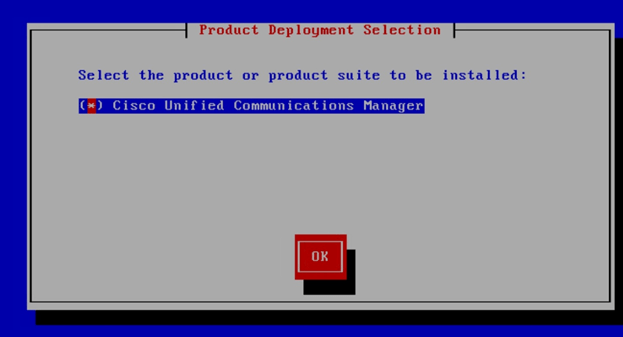

- Choose the import option in the Platform Installation Wizard

- The Component installation will proceed

- You will see the “Import Upgrade Configuration Information” page.

- Before proceeding with the data import, you need to configure the network settings.


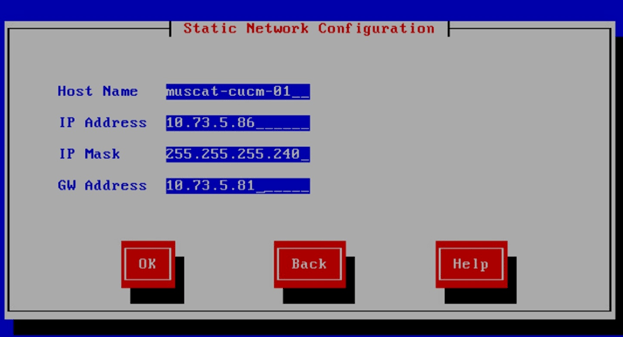


- Provide the SFTP server details to import the exported data.
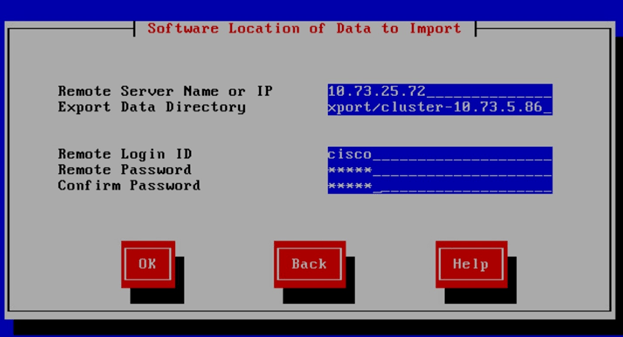

- Complete the certificate and NTP configurations, and the installation will finish after some time.
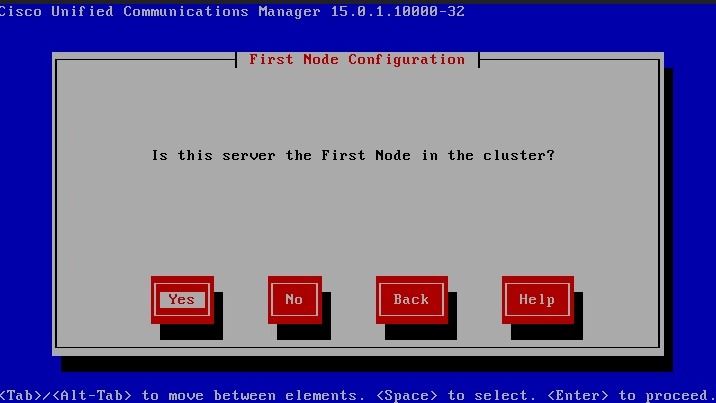
- Install the New Subscriber
- Follow similar steps as the Publisher installation.
- Ensure the Subscriber is configured to connect to the new Publisher.
- You will be prompted to specify whether this is the first node or not, for subscriber choose yes
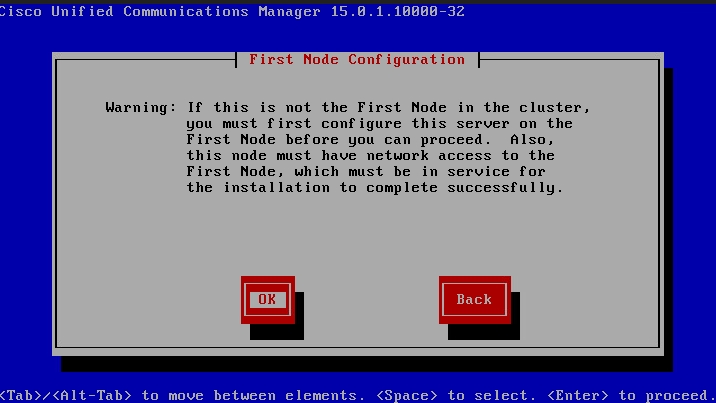

- You will be asked to enter the hostname and IP address of the Publisher node.
Note: The security password will be auto-populated, so you do not need to provide it again.

- The installation will proceed after validating connectivity to the Publisher.


- Verification
- After installation, verify the setup by running commands like show myself, show version active, and utils dbreplication runtimestate.

Thanks bro
what about the data import
is there a command for that ?
LikeLike
you need to install the cop to support the command. After you install the COP from cli you will see utils system upgrade datexport command
LikeLike
No command you have to do Install with Data Import. When installing the new node during Platform Installation wizard you have to select Import to import data from the SFTP server.
LikeLike
The data import must be performed during the initial installation.
LikeLike
Does this include certs as well?
LikeLike
so during the export you can change the hostname and IP address? That’s very interesting of you can. Do you have to do a touchless install and create a vfloppy or just use the normal install script to install the backup from SFTP?
Thanks
LikeLike
While exporting You can specify a new IP if you prefer to install the new node on it. There’s no need to create a Floppy. During the installation, you’ll be prompted to select whether you’d like to import the configurations. Choose this option and you’ll be asked to enter the SFTP details where the exported data is located. The only thing to ensure is that the new IP and hostname you configure should match the one you mentioned during the export.
LikeLike
You can change the IP address and hostname during the export. You can try the touchless method; there is a new section for providing the Software Location of Data to Import on the Answer File Generator and the install script to import from the SFTP.
LikeLike
Thanks for sharing this knowledge with the community, recently I upgraded my cluster from version 11.5 to 14 with Data export/import using Solarwinds but the importation was failing because of Solarwinds. The case has been troubleshooted with the cisco TAC and we replace Solarwinds with FreeFtpd and the importation was successfull.
I do not advice to use Solarwinds for data importation
LikeLike
Thanks for sharing the information about SolarWinds facing issues during upgrades. However, I’ve never encountered problems with either freeFTPD or SolarWinds. That said, I’ve heard many complaints about freeFTPD, particularly regarding their 1 GB restriction. I’m not sure if the newer versions of freeFTPD have resolved these issues and are performing well.
LikeLike
Thanks for sharing this knowledge with the community, recently I upgraded my cluster from version 11.5 to 14 with Data export/import using Solarwinds but the importation was failing because of Solarwinds. The case has been troubleshooted with the cisco TAC and we replace Solarwinds with FreeFtpd.
I do not advice to use solarwinds for this upgrade type
LikeLike