When deploying UC application one thing i hate is all that questions which i need to answer during the installation through the console. When going through some presentations i found something inserting called “Touchless VM installation from CUCM” . This feature got introduced from CUCM version 10.5.2 and i think i am the only one who came to know about this so late.
With this feature, the entire cluster installation can be started at the same time. Subscriber will have to wait for the publisher to come online in case Publisher installation is still in progress. On completion of the publisher installation, the waiting subscribers will be added to its server table. Once the subscribers are added to publisher, subscribers can proceed with their install.
When tried Touchless VM installation one my lab , i come across couple of issues.The first one due to the BUG CSCvo93985, Floppy drive 1 is not supported on the OVA.Which i resolved by adding another floppy drive, but you can also use the workaround mentioned in the BUG tool for the above mentioned BUG-ID.
Second , Browser issues with the XML generated on Mozilla version 86.0 (64-bit). Workaround was Internet Explorer.
Before proceeding, make note that there is a new feature that has been added. It is Dynamic Cluster Configuration.
- New Subscriber nodes get added to Publisher’s server table automatically when they come online and try to authenticate with Publisher. For this to happen, dynamic-cluster-configuration must be enabled first.
- This can be enabled either via AFG tool or via Command Line Interface (CLI).
- With this framework, you need not have to manually add Subscriber’s details in Publisher’s server page.
As a part of this feature, you must be able to generate platformConfig.xml file and clusterConfig.xml file from AFG tool. Also, you must be able to specifythe Dynamic Cluster Configuration timer value to be used and provide a prebuilt clusterConfig.xml file. If dynamic-cluster-configuration is used, you must be able to add details of timeout value for dynamic-cluster-configuration.
A collective co-ordination of cluster manager (clm) and upstart service makes this exchange of information between publisher and subscriber possible. This simplified cluster installation can be achieved by predefined cluster configuration generated using AFG tool. In this, publisher has the complete information about its subscriber nodes from clusterConfig.xml file. Publisher uses this information to add these nodes to its processnode/application table after publisher is successfully installed.
Configuration
Using AFG tool( link to AFG tool) we need to generate platformConfig.xml and clusterConfig.xml (if its a cluster).
note:- The XML names should be platformConfig.xml and clusterConfig.xml
I will deploy a CUCM cluster which consist of publisher and subscriber. From the AFG tool i generate the xml files by providing all required information to install my UC applications.


Clicking on Generate Answer file option, a new popup window will opon and you can save or download the XML files to your PC. Since publisher and subscriber use same platformConfig.xml name keep them in a different folder.

Clicking on Download File, another popup windows will open. you can copy the file or save it using the File option.

After saving it as an XML, if you open the file you could see something similar to the below.

Next step will make floppy drive using the above files and we use these floppy disk on our VM’s.To make a floppy image for CUCM publisher we need both platformConfig.xml file and clusterConfig.xml and only platformConfig.xml file for all other nodes which include CUCM Subscribers, IMP Publisher & IMP Subscriber.
I use WinImage to create two floppy image one for publisher called pubb.flp(the floppy image should be FLP format) and for subscriber subb.flp


Its time to upload floppy disk which we created above to the datastore where we install CUCM. Since i install both pub and sub on same server you see both files on my below screenshot.

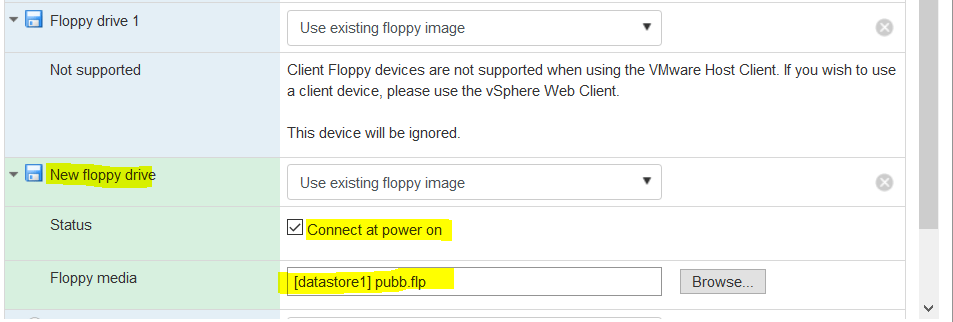
Using the OVA create the VM and go to setting. if you are using vmware 6+, you will see similar message for the existing floppy drive 1.

Workaround will be add a new Floppy drive and use the floppy disk image which we uploaded to the datastore. Also Mount the Installation media on your CD-Drive.
Do the same for all your servers in the cluster.
Installation starts by booting up the VM nodes with floppy image and bootable ISO being mounted. You need to ensure that the VM machine is configured to boot from CD-ROM. If not, you can modify the BIOS setting to allow the same. Please power on the VMs.
Once the VMs have been powered on, it begins its pre-boot stage process wherein it asks you to test the media or continue.You need to enter OK or SKIP.

Then you get the “Proceed with instillation” screen, where you need to enter YES or NO.

Your automated installation starts now…..


Thanks alot for your blog, This really helped me, I would say with v15 you can just modify it bit. There is no more floppy disk and it is using a .ISO on a second DVD.
LikeLike
I’ll update the blog for version 15.
LikeLike